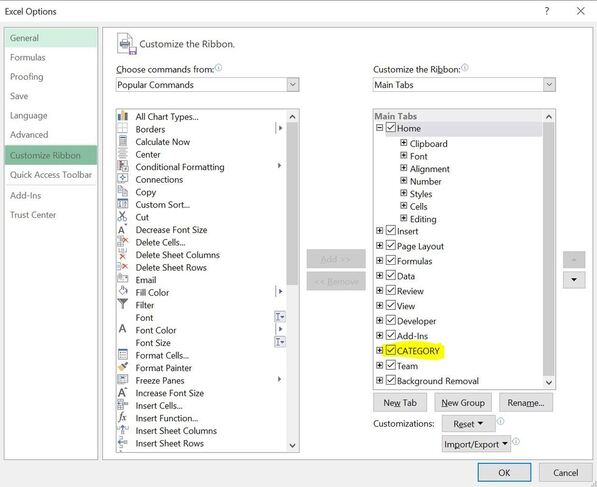
•category excel add-in•

Data Analytics Efficiency
less time processing. more time analyzing
|
|
|
|
CATEGORY Add-In is an Excel Add-In that helps group data in any Excel Worksheet to specific user defined data categories and types for the purpose of understanding this data and be able to perform wide variety of analysis, comparison or reconciliation.
The Add-In provides the user with a great flexibility to define the rules and determine how the data should be mapped to these categories in an automated fashion without the need to write complex Excel formulas. The outcome is a CATEGORY column inserted into the worksheet with each row mapped to a particular Data Category. CATEGORY Add-In is 100% Free.. it's not offered as a Trial version.. nor with limited features |
|
|
Excel users are often faced with cases where they need to work with a large data set that includes hundreds and even thousands of rows. In many of these cases, the user would want to understand the data and make some related conclusions that will help with the analysis.
The proper way to handle this is to map this data that is presented in a large volume of rows to specific groups or categories related to the purpose of the analysis that is being conducted. And then by aggregating the data with these mapped categories (using a Pivot table for example) the user can have a summary of findings that can help draw some useful conclusions. Learn more about Data Categorization For Analytical Purpose and why it is important, how it can help any Excel user and how it can be done. |
|
|
CATEGORY Add-In can be very useful for any Excel user who is working with any data in Excel especially if this data involves any of the followings:
• Doing any type of data processing or transformation like using excel formulas • Working with large amount of data • Performing an analysis that requires coming up with some related findings or conclusions • The data involves complex logic • The excel file where this data exists is in big size |
|
|
CATEGORY Add-In is a very strong and value added function that can help Excel's users achieve the followings :
• Follow a systematic approach to successfully complete any analysis that requires a good understanding of the data • You don't need to have deep knowledge about excel functions. With CATEGORY Add-In all you need is to have the ability to construct logical rules related to your data in a user-friendly entry forms • Be more efficient and save a significant amount of time and money by eliminating the need to construct complex formulas that involve the use of functions like IF, VLOOKUP, HLOOKUP, etc.. to apply any type of data processing/transformation • As it is easier and faster for the user processing the data to use CATEGORY instead of excel formulas it is also easier for any other user reading or reviewing the workbook to understand the defined rules without having a strong knowledge about excel formulas • Improve the performance of your Excel Workbooks by substituting complex excel formulas and functions with populating the same output with just values created for you by the CATEGORY Add-In while you can still view your defined rules and update them whenever it's needed • Save computer space and capacity by reducing the size of your excel files when you use CATEGORY |
|
|
Setup and Installation
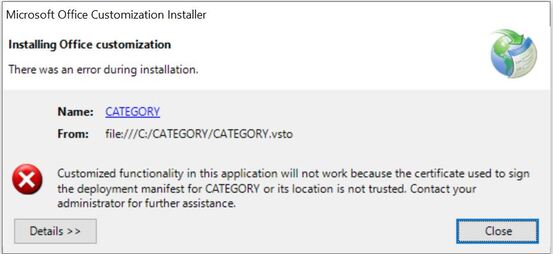
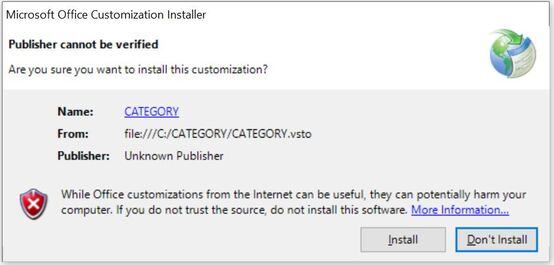
Please follow the instructions below to install CATEGORY: 1- Download CATEGORY setup file from here 2- Extract the files from the compressed setup file you downloaded and put them in one folder of your choice 3- Locate file "setup" in this folder and double-click on it 4- It's very likely that an error message will pop up as per the screenshot below |
|
|
Working with CATEGORY Add-In
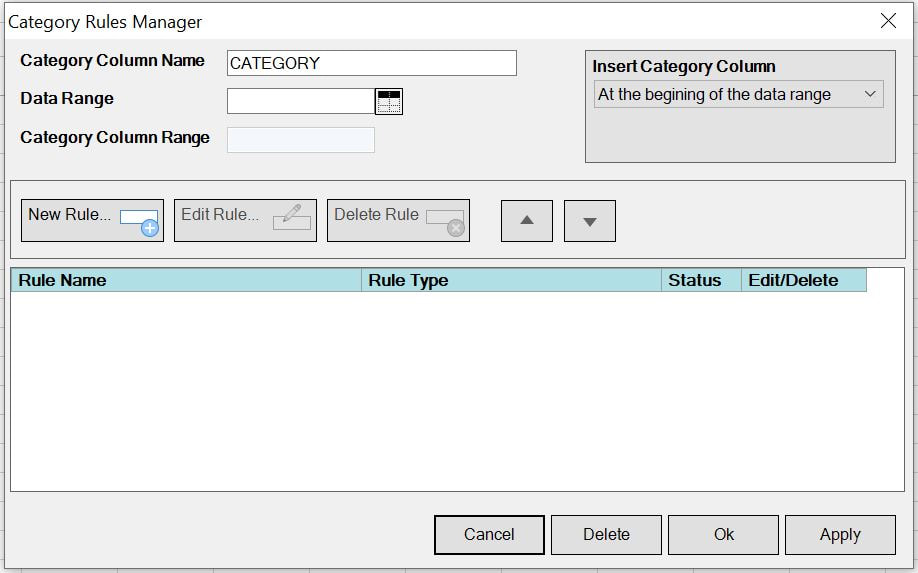
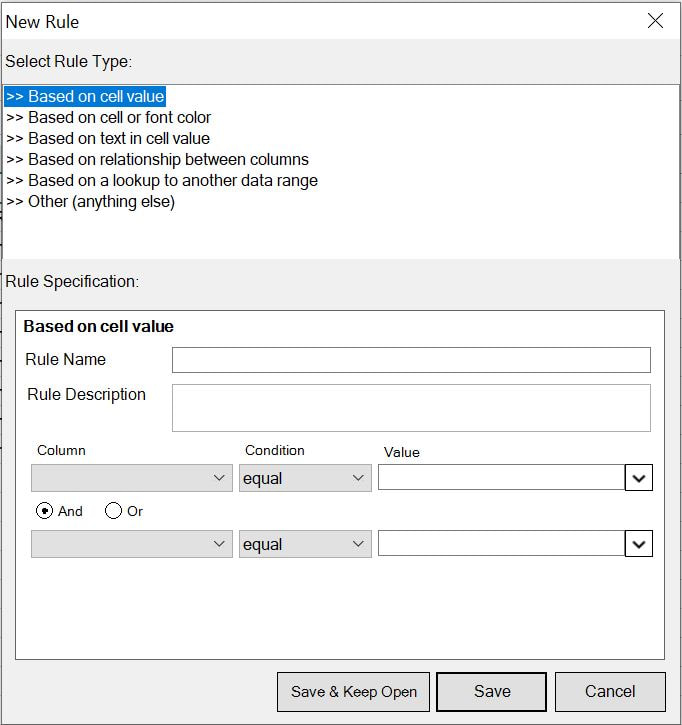
Please follow the steps below to: 1- Click on the CATEGORY tab. It will be a new tab (same like FILE, HOME, INSERT, etc..) added to your Excel Ribbon after you've installed CATEGORY 2- Click on the "Manage Rules" button 3- When the "Rules Manager" form opens, click on the button on the right side of the Data Range or click inside the test box 4- An Input box will open, choose the data range starting from the column labels row. Note: All columns in the Data Range must have labels 5- Choose from the "Insert Category Column" dropdown box where you want the CATEGORY column to be inserted 6- Click on the "New Rule" button to start creating rules 7- When the "New Rule" form opens choose the type of rule you want to add 8- Enter the Rule Name and Description 9- Select the Rule criteria. When the rule is applied, CATEGORY Add-In will loop through all rows in the Data Range you selected and any rows meet this criteria the respective Category Name you entered for that rule will be populated in the CATEGORY column for these rows 10- Press the "Save" button to save the rule and return to the "Rules Manager" form 11- Press the "Ok" button to apply the rules and close the form or the "Apply" button to apply the rules and keep the form open. |
|
|
Notes about some important CATEGROY features
The order of how Rules are applied Please note that the rules will be applied based on their order in the Rules Manager grid. You can always change this order whenever you'd like. Please see below the instructions on how to change the rules order. Meaning that after Rule 1 has been applied and might have been assigned in the CATEGORY column to some rows, Rule 2 will only try to match unassigned rows meaning whatever couldn't been assigned by Rule 1 and so on for Rule 3, etc.. At the end there will be only one Category assigned to each row and if a row couldn't pass the criteria of any of the rules, then this row will have an empty cell in the CATEGORY column. To edit rules In the "Rules Manager" form click on the check box for the rule you want to edit and press the "Edit Rule" button or double-click on the rule row in the grid. The "New Rule" form will open populated with the rule details, make the changes and then press save. To delete rules In the "Rules Manager" form click on the check box for the rule(s) you want to delete and press the "Delete Rule" button To delete all rules In the "Rules Manager" form click on the "Delete" button below the grid and all rules will be deleted. Only the rules will be deleted but the CATEGORY column won't be deleted. If you'd like to delete the CATEGORY column you can delete in the worksheet like any other excel column. To change rules order In the "Rules Manager" form click on the check box for the rule you want to change its position in the grid and press the up arrow or down arrow buttons located on top of the grid to move the rule up or down the grid. |
|
|
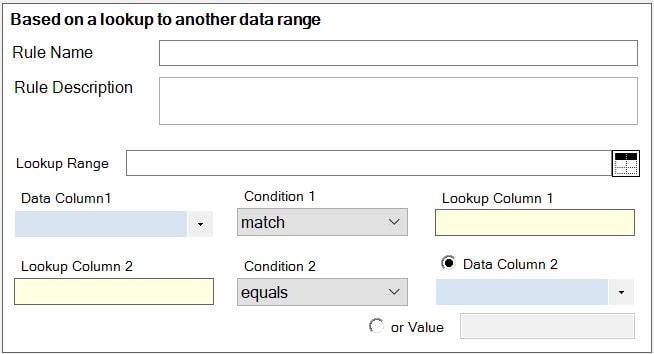
Additional Instructions For Rule: "Based on a lookup to another data range":
• First select the Lookup Range which can be an excel range in the same workbook or in another workbook. Please bear in mind that the first column in your selected Lookup range will be Lookup Column 1 range and the last column in your selected Lookup range will be Lookup Column 2. The two column names will be populated in the correspondent boxes in the "New Rule" form (in beige background color) • Select Data Column 1 (in light blue background color) which is the main identifier in the Data Range • Select either data Column 2 (in light blue background color) which is the column that will be compared to Lookup Column 2 or click on "or Value" radio button to input a value |
|
